How to Run a Private (Local) Ethereum Network with Go Ethereum


I've been learning more and more about Ethereum lately and I wanted to solidify some of my understandings by running an Ethereum node locally. I ran into several issues along the way due to a combination of less-than-helpful documentation and super outdated Stack Exchange and Medium posts. In this post I'll give an up-to-date (as of May 2022) tutorial on how to get started running a local, private Ethereum network using geth. This post will take a number of liberties and is not intended for any form of production use.
Special thanks to Pradeep for his article which helped me get a baseline understanding of many of the necessary steps to achieve this.
Getting Started
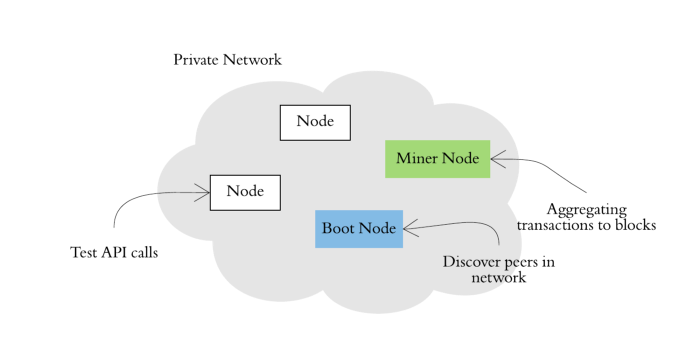
In order to simulate a more robust Ethereum network, we are going to spin up 1 miner node, 1 boot node, and 2 non-mining (peer) nodes.
This post will assume that geth is already installed locally. Install instructions for geth can be found here.
The first step is to create the necessary directory structure for the mining and peer nodes. Each node must use its own directory to store its data.
mkdir data/
mkdir data/node1
mkdir data/node2
mkdir data/miner
The next step is to create an Ethereum account on each node. The bootnode (discussed in the next section) does not require an account. For simplicity's sake, all of our accounts will share the same password: password.
echo "password" > password.txt
geth --datadir data/node1/ account new --password password.txt
geth --datadir data/node2/ account new --password password.txt
geth --datadir data/miner/ account new --password password.txt
Calling geth account new will output a bunch of information, including the public address of the account's key:
Your new key was generated

Public address of the key:   0xb509C72D257F316804dA59cfD1b33293Caf02B01
Make note of the public key generated for the node1 account, as it will be referenced in the genesis block configuration below.
The Genesis Block
The first block of every Ethereum-based blockchain is known as the genesis block. In the case of Ethereum mainnet, the genesis block is hard-coded into the geth source code. In the case of a private/custom geth network, the genesis block is configurable. Create a new file called genesis.json and insert the following:
{
  "config": {
    "chainId": 666,
    "homesteadBlock": 0,
    "eip150Block": 0,
    "eip155Block": 0,
    "eip158Block": 0,
    "byzantiumBlock": 0,
    "constantinopleBlock": 0,
    "petersburgBlock": 0,
    "ethash": {}
  },
  "difficulty": "1",
  "gasLimit": "8000000",
  "alloc": {
    "XXXXXXXXXXXXXXXXXX": { "balance": "100000000000000000000" }
  }
}
The chainId parameter is important and should be set to a number that is not already in use by another blockchain. Chainlist can be referenced to see existing chains and their IDs. This example will use id 666.
The alloc parameter is used to pre-fill specific wallet addresses with an amount of Ether (set in wei). Use eth-converter to convert between Ether and wei, if necessary. This blockchain will start with 100 Ether in the node1 wallet generated earlier. Replace XXXXXXXXXXXXXXXXXX with your wallet address.
Save the changes to genesis.json. Now that the genesis block is configued, each of the nodes must be configured to use it:
geth --datadir data/node1/ init genesis.json
geth --datadir data/node2/ init genesis.json
geth --datadir data/miner/ init genesis.json
Every node in a blockchain must have the same gensis block in order to participate.
The Bootnode
An Ethereum bootnode is used to facilitate the connection of peers in an Ethereum network. It does not store any blockchain data and does not have any awareness of the state of the chain.
Bootnodes are identified by an enode. Enodes are derived from private key, so that key must first be generated before the bootnode can start. Open a terminal and run the following command which will generate the private key and start the bootnode on local port 30300:
$ bootnode -genkey boot.key
$ bootnode -nodekey boot.key -addr :30300

enode://af20e504f8b4c57c7572fe182d55868cc3fd6c4905d1fcb8607cd5c149ce6c21fbf863d4655ad4c6b168b38105a75556efbc601cbe1641cf89d7ee9301f3bd98@127.0.0.1:0?discport=30300
A long enode address will be output. Copy or make a note of this address, as it will be needed in the next section to configure the peer and miner nodes. The bootnode must remain running in the next sections in order for nodes to connect with each other.
Starting The Miner and Peers
The commands to start the miner and peer nodes for a private network are pretty long, as they require a lot of configuration.
Starting the First Peer
Open a separate terminal window and run the following in the same directory as earlier commands:
geth --datadir data/node1 --ipcdisable --port 30301 --bootnodes 'enode://XXXXXXXXXX@127.0.0.1:0?discport=30301' --networkid 666 --http --http.addr 'localhost' --http.port 8101 --http.api 'admin,debug,eth,miner,net,personal,txpool,web3' --allow-insecure-unlockLet's cover everything going on in this command:
--datadirindicates the data directory for the databases and keystore. Each node is required to have a unique data directory.--ipcdisabledisables the IPC-RPC server, which is not needed since all the nodes are running locally andgethdoes not need to communicate with any external processes.--port 30301specifies the network listening port. Each node is required to run on a unique port.--bootnodes 'enode://XXXXXXXXXX@127.0.0.1:0?discport=30301'configures a list of bootnodes. Replace the enode in this command with the one generated from the bootnode section above.networkid 666sets the networkid and should match the network id configured in the genesis block, otherwise the node will default to network1.--http --http.addr 'localhost' --http.port 8101 --http.api 'admin,debug,eth,miner,net,personal,txpool,web3'are all flags used to enable and configure the HTTP-RPC server, which is necessary toattachto this node in the next section.--allow-insecure-unlockallows for insecure account unlocking when account-related RPCs are exposed by HTTP. This is necessary for sending a transaction in the next section, but should never be used in a production environment.
This command will output a lot of information and then start to hang as it awaits updates to the network and the blockchain. Leave this node running throughout the rest of the sections.
Starting the Second Peer
The second peer requires a similar command to the first, but does not require as many arguments since you will not need to attach to it later on. Open another separate terminal window and run the following:
geth --datadir data/node2 --ipcdisable --port 30302 --bootnodes 'enode://XXXXXXXXXX@127.0.0.1:0?discport=30301' --networkid 666Remember to replace the enode again with the enode of your bootnode, and to increment the --port argument by one.
After running the command above, the node1 and node2 peers should starting showing some Looking for peers logs:
INFO [05-16|15:38:13.076] Looking for peers                        peercount=0 tried=0 static=0
INFO [05-16|15:38:48.077] Looking for peers                        peercount=1 tried=1 static=0
This shows that the bootnode is working properly and connecting the nodes to eachother. The peercount here shows how many nodes that the current node is connected to.
Starting the Miner
Now that the two peer nodes are running, it's time to spin up the miner node and start mining some new blocks. Open another separate terminal window and run the following:
geth --datadir data/miner --ipcdisable --port 30303 --networkid 666 --bootnodes 'enode://af20e504f8b4c57c7572fe182d55868cc3fd6c4905d1fcb8607cd5c149ce6c21fbf863d4655ad4c6b168b38105a75556efbc601cbe1641cf89d7ee9301f3bd98@127.0.0.1:0?discport=30300' --mine --miner.threads=1This command is just like the commands used to start the peer nodes, but uses the --mine --miner.threads=1 flags to enable and configure mining.
Again, this command will produce a lot of output, and then it will begin quickly mining blocks. The mining output will look as such:
INFO [05-16|15:48:40.869] Successfully sealed new block            number=1485 sealhash=896e95..e90aa2 hash=3da9ce..a64b24 elapsed=4.822s
INFO [05-16|15:48:40.870] 🔗 block reached canonical chain          number=1478 hash=4c6419..071906
INFO [05-16|15:48:40.870] 🔨 mined potential block                  number=1485 hash=3da9ce..a64b24
INFO [05-16|15:48:40.870] Commit new sealing work                  number=1486 sealhash=1fbab6..1fc7e3 uncles=0 txs=0 gas=0 fees=0 elapsed="83.25µs"
INFO [05-16|15:48:40.870] Commit new sealing work                  number=1486 sealhash=1fbab6..1fc7e3 uncles=0 txs=0 gas=0 fees=0 elapsed="138.291µs"
Switch back to either of the peer node terminals and notice the new logs:
INFO [05-16|12:37:31.196] Imported new chain segment blocks=1 txs=0 mgas=0.000 elapsed=3.21ms mgasps=0.000 number=10 hash=28093f..6040a7 dirty=4.66KiBThese logs show the peer successfully syncing with the blockchain as new blocks are being mined. The txs=0 shows that new block did not contain any transactions.
Let's fix this by sending a transaction.
Sending a Transaction
Now that all the nodes are running and connected, it's time to test out one of the most important features of the blockchain: transactions. geth includes an interactive console which uses web3.js to allow for real-time interaction with the blockchain. In another new terminal window, run the following:
geth attach http://localhost:8101
This command will connect to a JavaScript REPL running on node1. You can then use various web3.js APIs to interact with the node and blockchain, as seen below:
// assign node1's only wallet to a convenience variable
> acc1 = personal.listAccounts[0]
"0x21329978ad966f05cea6e348e34ed103b5b25e87"

// assign node2's only wallet to another variable
> acc2 = "0x209787cdd6f27ba51517cd87ec7f42370926782c"
"0x209787cdd6f27ba51517cd87ec7f42370926782c"

// check the wallet's starting balance
> eth.getBalance(acc1)
100000000000000000000

// send a small amount of Ether from acc1 to acc2
> eth.sendTransaction({from: acc1, to: acc2, value: '5000000'})
Error: authentication needed: password or unlock
	at web3.js:6365:37(47)
	at send (web3.js:5099:62(35))
	at <eval>:1:20(10)

// unlock the wallet
> personal.unlockAccount(acc1, "password")
true

// send Ether again after unlocking the account
> tx1 = eth.sendTransaction({from: acc1, to: acc2, value: '5000000'})
"0xbb0f034b69b3456cc514fae266f5d3a01ada59f5b9901c76a415f0c24d85c6a1"

// get details about the transaction
> eth.getTransaction(tx1)
{
  blockHash: "0xaff02931234dbad170535aafacd44ba43b361b40ce5e097a66b28bab237891a2",
  blockNumber: 118,
  from: "0xd7a4077d0cf40673cffe9afe871a270f07df457c",
  gas: 21000,
  gasPrice: 1000000000,
  hash: "0xbb0f034b69b3456cc514fae266f5d3a01ada59f5b9901c76a415f0c24d85c6a1",
  input: "0x",
  nonce: 0,
  r: "0x4580fc207b0c3b0d9a2441275ca0ba59065c3fabff525cb8da6d7c275bd819fa",
  s: "0x30ce54642cc23d25d7bc5b9c20fd725b82b09c2fcf35178f735532f9f333df46",
  to: "0x209787cdd6f27ba51517cd87ec7f42370926782c",
  transactionIndex: 0,
  type: "0x0",
  v: "0x558",
  value: 5000000
}

// observe that the node1 wallet balance has decreased
> eth.getBalance(acc1)
99999978999995000000

// observe that the node2 wallet balance has increased
> eth.getBalance(acc2)
5000000
After running the eth.sendTransaction command, switch to the terminal tab for the miner node and look for a log similar to this that shows the new block with the transaction from above in it (as indicated by txs=1):
INFO [05-16|17:06:37.390] Commit new sealing work number=118 sealhash=c25d39..bf70e9 uncles=0 txs=1 gas=21000 fees=2.1e-05 elapsed="268.667µs"Switch back to the JavaScript REPL and observe more details about this particular block:
// get details about the specific block with the transaction
> eth.getBlockByNumber(118)
{
  difficulty: "0x21d9d",
  extraData: "0xd783010a11846765746886676f312e31388664617277696e",
  gasLimit: "0x7a1200",
  gasUsed: "0x5208",
  hash: "0xaff02931234dbad170535aafacd44ba43b361b40ce5e097a66b28bab237891a2",
  logsBloom: "0x00000000000000000000000000000000000000000000000000000000000000000000000000000000000000000000000000000000000000000000000000000000000000000000000000000000000000000000000000000000000000000000000000000000000000000000000000000000000000000000000000000000000000000000000000000000000000000000000000000000000000000000000000000000000000000000000000000000000000000000000000000000000000000000000000000000000000000000000000000000000000000000000000000000000000000000000000000000000000000000000000000000000000000000000000000000",
  miner: "0x2a42b361caa4e4b1a3a979d988838deecbb03916",
  mixHash: "0xa9ee2a914536ad6761ff09253880163cd4d1ddb72beaf8e67331a5ef75879420",
  nonce: "0x382db97a79b732d6",
  number: "0x76",
  parentHash: "0xea93bce69e236c3714c3be473834c7806dc740fb83ae3c469dd6398d1d20511a",
  receiptsRoot: "0x056b23fbba480696b65fe5a59b8f2148a1299103c4f57df839233af2cf4ca2d2",
  sha3Uncles: "0x1dcc4de8dec75d7aab85b567b6ccd41ad312451b948a7413f0a142fd40d49347",
  size: "0x284",
  stateRoot: "0xc7d112d470a0e2a04030d26f4628ef62b13a42c7350d96bc986f49f290dedd3f",
  timestamp: "0x6282bcda",
  totalDifficulty: "0xf2bf46",
  transactions: ["0xbb0f034b69b3456cc514fae266f5d3a01ada59f5b9901c76a415f0c24d85c6a1"],
  transactionsRoot: "0xc9d70dd259cb7f47dc29191b15761b2a7ca1cc9bb320b92ef031983e17dd8837",
  uncles: []
}
This is just a small preview of the power of the JavaScript REPL provided by geth.
Remote Connections
This section is coming soon. The goal is to allow for a node from an external network to connect to a locally running node and be able to send/receive transactions within the private network. Stay tuned for the completion of this section.
Wrapping Up
This post has covered the initialization and startup of a private blockchain network comprised of a bootnode, a mining node, and two peer nodes. There is a lot more to explore here and the JavaScript console is a great way to do that. Check out the latest web3.js API docs to see all of the APIs that can be explored.
Hopefully this post contained some new or useful information. Thanks for reading!